Sticky Posts in Blogger
In all Blog platforms, new posts are always shown first and older posts are archived. With a simple trick, we can have this earlier post remain on the Home page, above all the new posts.
Create a Page Element Method
One recommended way to have a piece of writing permanently on top of the Blog Posts is to work it into the template by creating a Page Element.
1. Follow our article in Add Page Element to Blogger Header and Blog Posts. Enable the “Add a Page Element” function in the Blog Posts and if you'd like, the space between the Header and the Blog Posts. This is an interesting location, because it is right after the Header and yet does not follow the style settings of the Header. For people who want to insert a Horizontal Menu and Navigation Bar, this might be an ideal location. Once you have done that, you should be able to add new elements above the Blog Posts or right underneath the Header.
2. The second step is to create the Post. Login, go to “Posting” and create a New Post under the “Compose” mode. If you don't see a “Compose” mode, go to Settings -> Basic and at the bottom, to the question “Show Compose Mode for all your blogs?” choose “Yes” and save the settings. Type your Post contents, upload your pictures, create your links, etc. While you don't have to insert the labels, put in the Title of the article within the contents. Make the title large, bold or change the font color. Preview the post and if you are satisfied with it, you can save the draft Post and go to the next step. [Note: To check the Post Title font-size and color code settings, go to Template -> Edit HTML and look for .post h3{ You would be able to see the font-size, font-weight (if any) and color. Apply the same style to the Title that you have typed in the contents of your draft Post.]
3. Click to view the post under the “Edit HTML” mode.

4. There are some things you must do. If in your Settings -> Formatting -> Convert line breaks you have chosen “Yes”, whenever you press the “Enter” or “Return” key on your keyboard, the Post Editor will convert that into the HTML tag <br/>. We must now enter these tags into the HTML of the draft Post. Go to your draft Post under the “Edit HTML” mode.
Example 1:
At the places where you press an “Enter” key to create a line break, add the HTML tags as follows:-
Line One <br/> Line Two |
|---|
Example 2:
Between each new paragraph, add this HTML tag:-
Paragraph One <br/><br/> Paragraph Two |
|---|
Example 3:
You can also add this instead:-
Paragraph One <p> Paragraph Two </p> |
|---|
5. Once these are added to the Post, we can now block copy the entire chunk of the draft Post HTML code. Go to Template -> Page Elements -> Add a Page Element in the Blog Posts section and choose “HTML/JavaScript”. Paste the entire draft Post HTML code and save. View your Home page, and you will see the Sticky Post permanently displayed above the Blog Posts.
6. Finally, we can delete the draft Post. If you have uploaded pictures, you will be asked whether you want the pictures deleted. Since you are using these pictures in your Sticky Post, uncheck the box to keep the pictures in your Picasa Web Album.
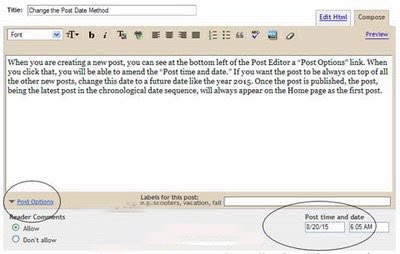
Change the Post Date Method
When you are creating a new post, you can see at the bottom left of the Post Editor a “Post Options” link. When you click that, you will be able to amend the “Post time and date.” If you want the post to be always on top of all the other new posts, change this date to a future date like the year 2015. Once the post is published, the post, being the latest post in the reverse chronological date order, will always appear on the Home page as the first post.
Important Notes:
i) In the new Blogger platform, the URL of Posts follow the month and year that are specified in the “Post month and date” option. In our example, we specified the month as August and the year as 2015. The Post URL will be http://BLOG URL/2015/08/TITLE.html. This URL will remain unchanged even if you edit the post and alter the date. Good for us. It means that we can change the date of an earlier post without affecting the backlinks to that post. People who linked to that URL will not have to change the link address.
ii) You can therefore alter an existing post in the same manner. Edit the Post. Change the year to a much later year and the post will always appear on your Home page.
iii) The other point to note is that when the year 2015 arrives, you may have to alter the post date yet again to another later date. Who knows, perhaps by then you may not want that post to appear on your Home Page anymore.
iv) If you want a recent post to be stored somewhere at the end of your archive list, and never to appear in the list of recent posts, use the same method but change the date to an earlier date, a year like 1950.


Post a Comment